


Hello, today we will be exploring how to make mods for Unity based video games, particularly in this blog post we will focus on Unity games utilizing Unity's IL2CPP scripting interface. We will be looking at modding the game Last Epoch, while this game does have an online multiplayer, I will not be covering how to make any mods we write work online, as I do not want to condone multiplayer game cheating.
A note to the developers
If you somehow have found this blog post, I would recommend taking notes from other Unity based games and simply verify file checksums before allowing the player Online, as the majority of mod loaders require modifying the game files themselves. It may also be beneficial to write some code that checks the over the binary at runtime to mitigate against runtime hooks and further preserve the online experience.
Tools
We will be utilizing a few different tools for the purpose of reverse engineering as well as project simplification.
Melon Loader - a powerful mod loader that aims to be a universal solution for all Unity based games, including il2cpp and mono backed games.
IL2CPPDumper - il2cpp dumper allows us to dump "dummy dlls" which allow us to explore game functions and structures from dnSpy/ILSpy, header files for c++ projects, class files for c# projects, along with scripts for naming symbols in Ghidra/IDA/Binary Ninja, along with other useful things.
Il2CppAssemblyUnhollower - Generates proxy dlls to allow us to use game code from c#; it should be noted this is also built into Melon Loader, which we will primarily be utilizing for this project, but I still thought it was worth mentioning.
Unity Explorer - a very powerful tool which allows us to explore game objects, classes, structures, UI elements, function calls, and much more -- all from in the game itself.
The Goal
Those who have played AARPG style games in the past probably know where this project is heading, but for those who don't I'll explain our goal briefly. Many games of this genre benefit from having more information provided to the player, such as clearer monster types (monsters are usually colored grey, blue, yellow; as a way to indicate their difficulty, and thus rewards dropped such as experience and currency), telegraphed attacks, dangerous puddles on the ground, just to name a few. One such, and probably the most notable example of this was a project for Diablo 3 called Turbo Hud.
Getting Started
To get started we will install Melon Loader into the Last Epoch game folder, by running the Melon Loader installer, and navigating to the Last Epoch executable file, it should automatically select the game architecture as x64; and we will use the latest Melon Loader version (0.6.2) at the time of writing.
We will need to run the game once after doing this, to allow Melon Loader to ultimately run the programs IL2CPP Dumper, and IL2CPPAssemblyUnhollower, as well as it's own general setup process. This will give us a base to work from.
Setting Up The Project
To setup the project we will create a new C# project in Visual Studio, making sure to select the Class Library template, and .net 6.0. I will name my project Mod and thus the namespace and resulting DLL file will also be called and referred to as Mod in the future.
To get started with our Mod and get Melon Loader to handle loading it properly we need to first add some DLL dependencies to our project. To do so we will right click on the Dependencies section of the project explorer, click Add Project Reference, browse to Last Epoch game folder/MelonLoader/net6 and select the MelonLoader.dll,Il2CppInterop.*.dll files (Common, Generator, Runtime).
We will need to add some code, I did so under all my using statements, to indicate to Melon Loader information about our mod.
[assembly: MelonInfo(typeof(Mod.Mod), "Mod", "1.0.0", "ItsJustMeChris")]
[assembly: MelonGame("Eleventh Hour Games", "Last Epoch")]
We also need to expand our base Mod class to inherit MelonMod.
using MelonLoader;

[assembly: MelonInfo(typeof(Mod.Mod), "Mod", "1.0.5", "ItsJustMeChris")]
[assembly: MelonGame("Eleventh Hour Games", "Last Epoch")]

namespace Mod
{
    public static class BuildInfo
    {
        public const string Name = "Mod"; // Name of the Mod.  (MUST BE SET)
        public const string Description = "Mod for Testing"; // Description for the Mod.  (Set as null if none)
        public const string Author = "ItsJustMeChris"; // Author of the Mod.  (MUST BE SET)
        public const string Company = null; // Company that made the Mod.  (Set as null if none)
        public const string Version = "1.0.0"; // Version of the Mod.  (MUST BE SET)
        public const string DownloadLink = null; // Download Link for the Mod.  (Set as null if none)
    }

    public class Mod : MelonMod
    {
        public override void OnInitializeMelon()
        {
            MelonLogger.Msg("OnApplicationStart");
        }

        public override void OnLateInitializeMelon() // Runs after OnApplicationStart.
        {
            MelonLogger.Msg("OnApplicationLateStart");
        }

        public override void OnSceneWasLoaded(int buildindex, string sceneName) // Runs when a Scene has Loaded and is passed the Scene's Build Index and Name.
        {
            MelonLogger.Msg("OnSceneWasLoaded: " + buildindex.ToString() + " | " + sceneName);
        }

        public override void OnSceneWasInitialized(int buildindex, string sceneName) // Runs when a Scene has Initialized and is passed the Scene's Build Index and Name.
        {
            MelonLogger.Msg("OnSceneWasInitialized: " + buildindex.ToString() + " | " + sceneName);
        }

        public override void OnSceneWasUnloaded(int buildIndex, string sceneName) // Runs when a Scene has Unloaded and is passed the Scene's Build Index and Name.
        {
            MelonLogger.Msg("OnSceneWasUnloaded: " + buildIndex.ToString() + " | " + sceneName);
        }

        public override void OnUpdate() // Runs once per frame.
        {
            MelonLogger.Msg("OnUpdate");
        }

        public override void OnFixedUpdate() // Can run multiple times per frame. Mostly used for Physics.
        {
            MelonLogger.Msg("OnFixedUpdate");
        }

        public override void OnLateUpdate() // Runs once per frame after OnUpdate and OnFixedUpdate have finished.
        {
            MelonLogger.Msg("OnLateUpdate");
        }

        public override void OnGUI() // Can run multiple times per frame. Mostly used for Unity's IMGUI.
        {
            MelonLogger.Msg("OnGUI");
        }

        public override void OnApplicationQuit() // Runs when the Game is told to Close.
        {
            MelonLogger.Msg("OnApplicationQuit");
        }

        public override void OnPreferencesSaved() // Runs when Melon Preferences get saved.
        {
            MelonLogger.Msg("OnPreferencesSaved");
        }

        public override void OnPreferencesLoaded() // Runs when Melon Preferences get loaded.
        {
            MelonLogger.Msg("OnPreferencesLoaded");
        }
    }
}
I have also included the lifecycle methods of MelonMod.
We can now build our project and put it into the Last Epoch/Mods folder, upon running the game again you should see the lifecycle method names printed to the console.
Now that we have a basic project setup, we can begin the process of reverse engineering, to do so we will also move the Unity Explorer files into the Last Epoch game directory, and restart the game.
- At this point I also recommend that you manually run
IL2CPP Dumperto get the resulting C Sharp class file, allowing you to quickly search for classes, methods, and variables which may be named intuitively, allowing you to do some analysis statically without having to go through Unity Explorer.
Unity Explor'in
Now that we have Unity Explorer installed, we can load up the game in Single Player and do some looking around, the first steps I recommend are to find the local player instance, this will allow us to infer some more information that is useful in the future.
To do this we will open Unity Explorer (It is probably already open by default, if not, the hotkey is F7), head into the Object Explorer, and search for the word Player in all the scenes.
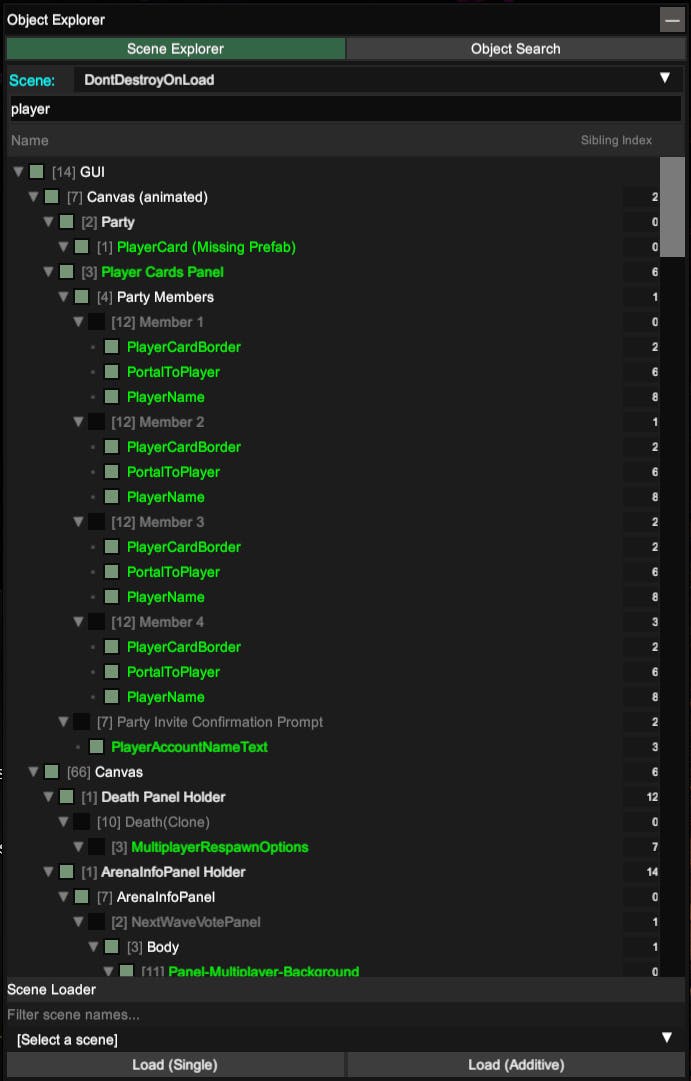
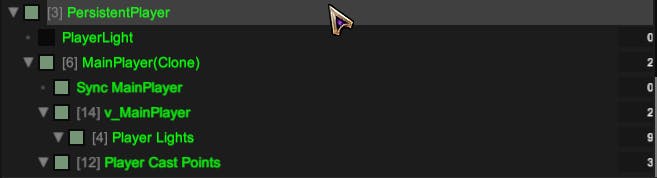
You'll note that there's many things brought up here, but if we scroll through the list we should be able to find something that stands out to us, the object I am referring to is the PersistentPlayer object, which has more gameplay child objects related to it as-well as an object called MainPlayer, this clearly is an important object.
Upon clicking on MainPlayer we can see that it brings up a lot of information, we also can note that the position does indeed update as the player moves, further clarifying that this is an important object relating to our player -- specifically as it is represented in the game world.
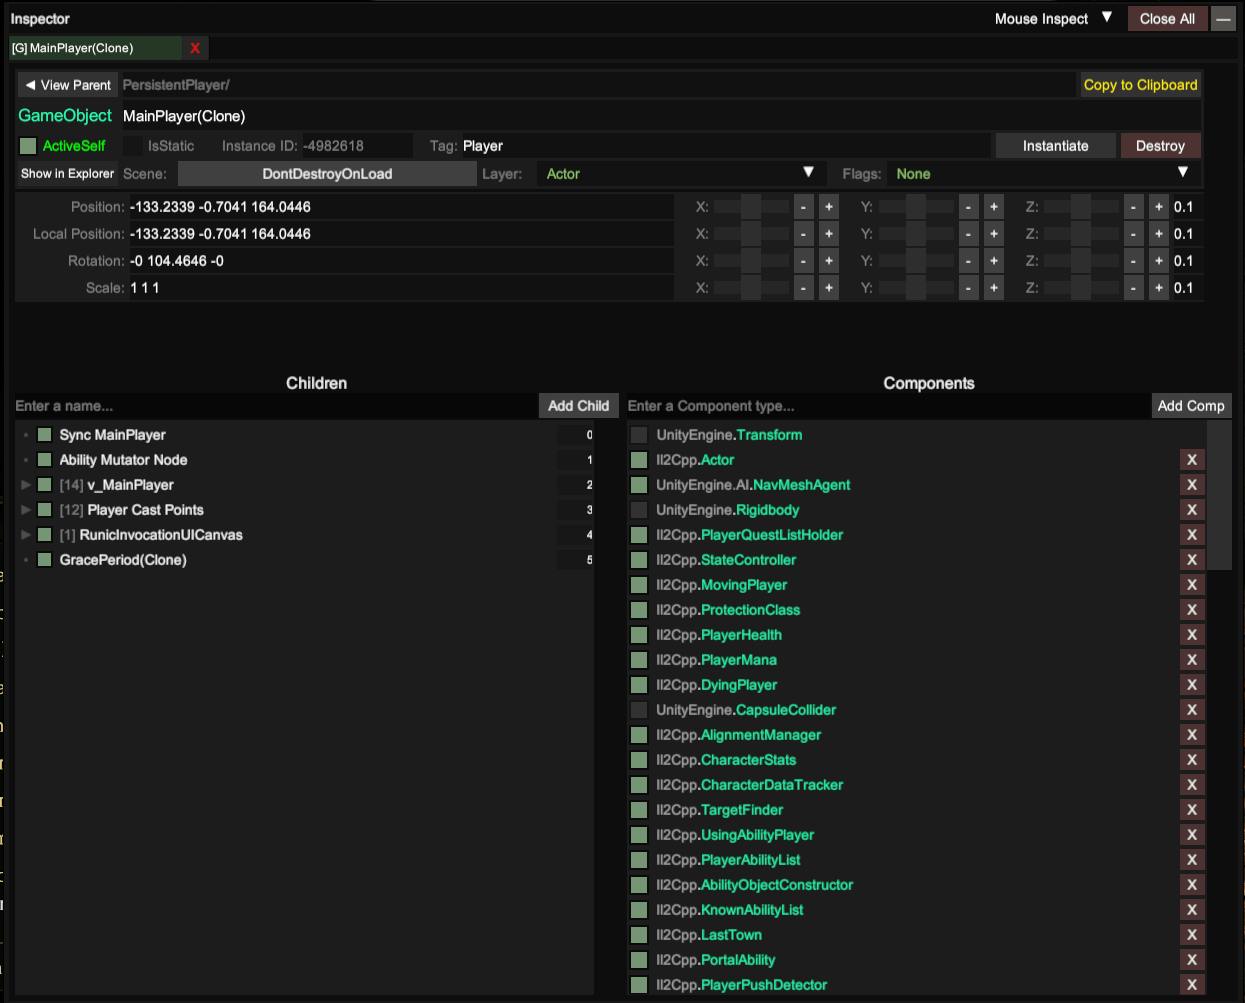
Those who have experience with video game development, or knowledge in reverse engineering video games may also immediately see something more of interest, the component Actor. We will come back to this later.
Let's get down to business, I learn best from things actually doing stuff, so we will implement a basic automation to help the player on their journey through Eterra.
Writing our first mod
Now that we know the local player is an object called MainPlayer(Clone) we can actually put some code down and make things happen.
Heading back to our Mod we will make a quick helper method GetLocalPlayer to obtain the Unity GameObject.
        private static GameObject? localPlayer;
        public static GameObject? GetLocalPlayer()
        {
            if (localPlayer == null)
            {
                localPlayer = GameObject.Find("MainPlayer(Clone)");
            }

            return localPlayer;
        }
You'll note we also made a private variable to avoid slamming the GameObjectManager needlessly. We can now head into the MelonLoader lifecycle OnUpdate, where we can write some logic to automate using the players health potion when their health reaches a threshold.
But before we are able to do so, we must also include the Il2CppLE.dll dependency from the MelonLoader/Il2cppAssemblies folder, this is the proxy dll allowing us to invoke game methods, you will also need to add the UnityEngine.dll as a dependency.
Okay, let's write some code.
        private static DateTime lastUse = DateTime.MinValue;
        public static void OnUpdate()
        {
            // Debounce invokations (onupdate runs every frame, we would move this code to its own debounced function eventually, but for this example we will keep it simple.)
            if (DateTime.Now - lastUse < TimeSpan.FromSeconds(1)) return;

            lastUse = DateTime.Now;

            var player = GetLocalPlayer();

            if (player == null) return;

            if (player.GetComponent<PlayerHealth>().getHealthPercent() * 100 <= 50.0f)
            {
                player.GetComponent<HealthPotion>().UsePotion();
            }
        }
Compile the Mod and restart the game, you will see that the player now automatically uses their health potion upon reaching less than 50% health. Congratulations, you made your first Mod for a Unity game!
What about Actor?
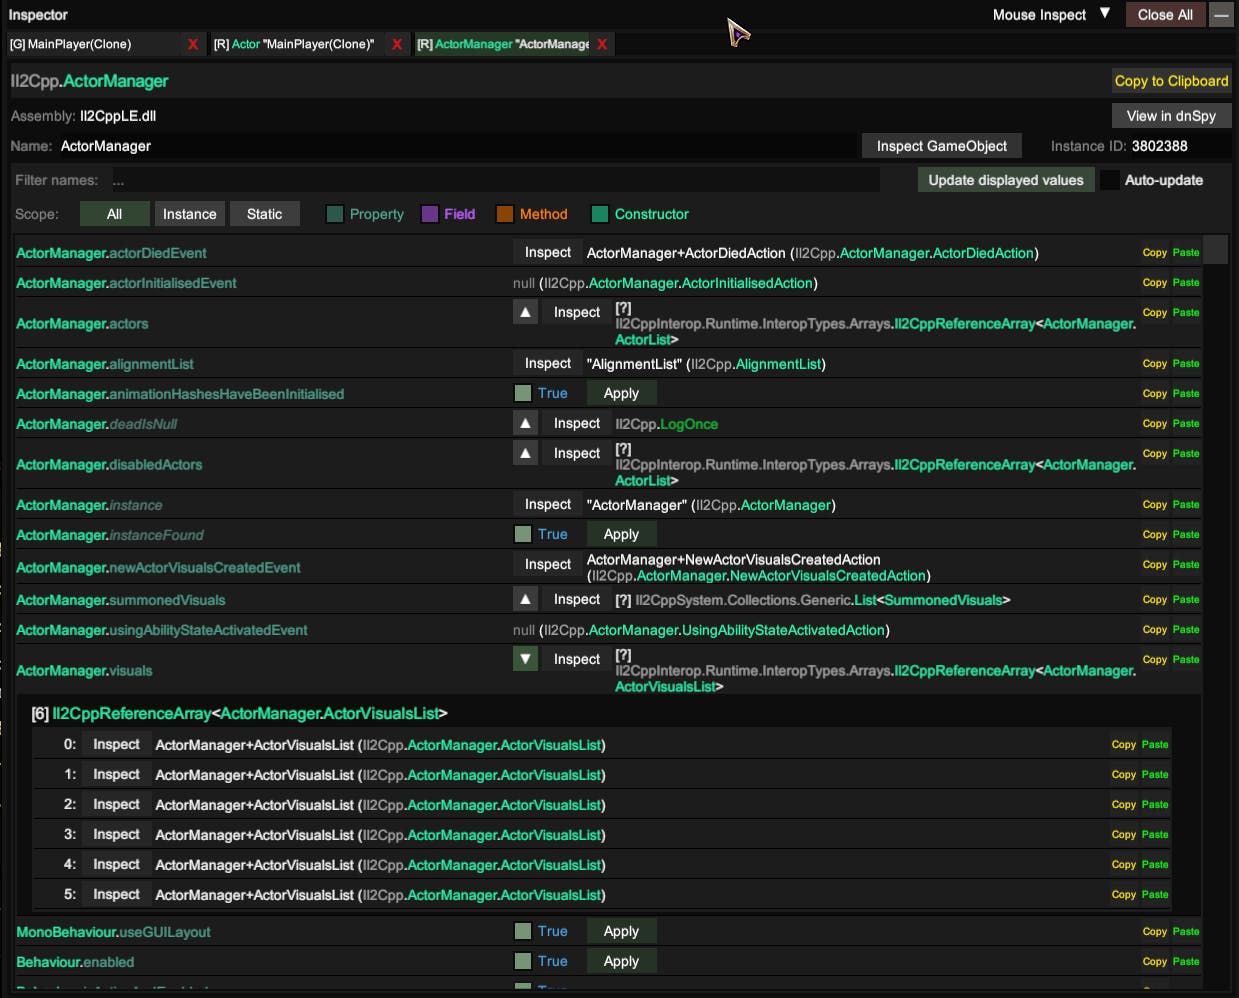
Okay, it took me a few hours to reverse how the game stored monsters, destroyable containers, minions, etc, so there will be some inferences in the writing here. Games commonly use the word Actor to describe, well, actors, entities in the game world which usually do things in the game world. There's also a common phrasing in games called Manager, a structure that aggregates instances into a single area to simplify logic in obtaining, iterating, and managing those objects. With this information, we can search the output dump.cs file from IL2CPP Dumper for 'Actor' and 'Manager', and find the ActorManager, from there we can find the class in UnityExplorer and poke around to see all the game actor lists, and actors themselves.
Now to keep this blog post relatively short, I will not go into detail of writing the actual mob ESP, but I have provided the code on GitHub for the full Mod.